Monday, August 05, 2013

Kwik Sew 3422 - Mens' Dress Shirt!! (LOVE IT)

Before I get started on this post, I just want to thank you all for the lovely comments you left me on my last 2 posts, the Sea of Love Dress and the Alice and Olivia dress refashion.  I worked very hard on both dresses and it was nice to see the final outcome on both dresses and like them, because sometimes,  I'm not always sure about some of the choices I make. This time, I can gladly say that everything worked out well. 

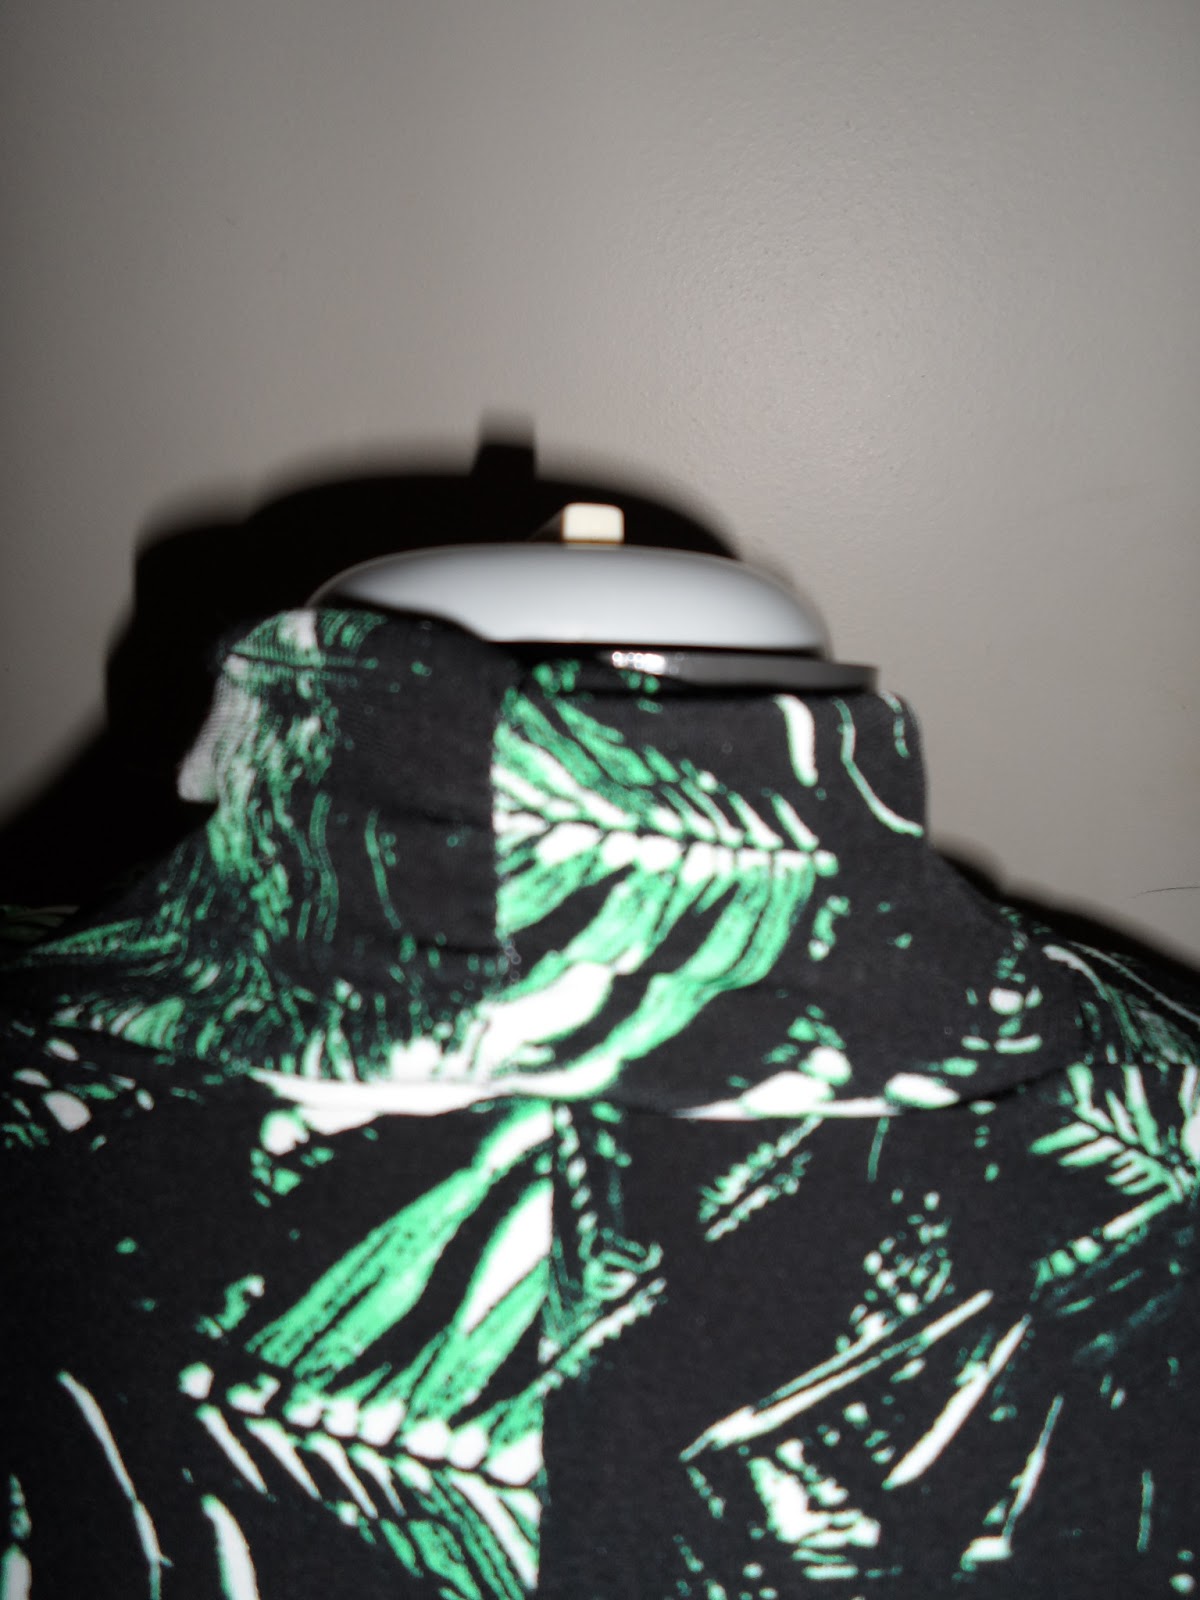
I wanted Mr. D to match me at the wedding so I stopped at Jomar a couple of months ago during an awesome sale they were having and got the shirting I used to make his shirt.  I think I paid either a $1.00 or $1.50 a yard.  The shirting is a cotton fabric that does wrinkle easily, but he doesn't care and loves it.


I used Kwik Sew 3422.


Karen told me about this pattern, and at the time I purchased it, Kwik Sew had been purchased by McCall Pattern Company.  The pattern was discontinued or stopped for a time.  I first purchased it through Amazon only to receive an email stating they couldn't send the pattern to me.  I then went to Fabric.com and they only had 2 copies of the pattern left.  I got one of the 2 patterns.  I'm happy to say one year later that the pattern is now available again and you can even download it as a PDF on Pattern Review.


This was my first time doing a cuffed shirt for my man, and I enjoyed making it.  I've made a short sleeved shirt for him before using another Kwik Sew pattern .  The process was pretty much the same except for the cuffs, plackets and neckband.  The plackets were the hardest part for me, but I figure, I can only get better at them as I make each new shirt that he requests, and yes, there will be more.


                   (Sorry the shirt's a little wrinkled.  I tried to steam it a little, hence the water mark.)


He's been approving fabric and telling me what he wants.  I have really opened up a can of worms here. This is an awesome pattern to work with and if you need a shirt pattern for your man, get this one.


You will not be disappointed   Mr. D just loves the fit.  If he's happy, I'm happy.

On to the next project.  By the way, has anyone seen a pattern for a mens' knit polo shirt.  I've been looking and haven't found one yet.  I getting ready to cut up one of Mr. D's polo shirts now to make a pattern. 

Sunday, July 28, 2013

Sea of Love Dress

I first saw this dress on Pinterest and kept it on my list just in case an event should come up that I could wear it to. 


Well, Mr. D and I were invited to a wedding and I thought, oh, I've got the perfect dress inspiration.  It was too warm to wear  the long sleeve version, so my version had to be for the summer and I didn't want to wear a strapless dress, so I changed things up a little.  I looked at many patterns to try and figure out which would work best for me but in the end I went with McCall 6466 for the bodice.


 I had to do a bit of lengthening to make it work, but it worked out. The pattern I used had a midriff piece that I did not use so I actually used it to help me add length to the bodice.   I decided not to make the bodice as long as my inspiration picture because I didn't like the look with the sheer fabric, and lets face it, gravity has been working against me lately and I haven't had time to work it off. 


I used  Vogue 2902 for the skirt.


I wanted to go as vintage as possible as the vintage patterns tend to have a much fuller skirt than most of the patterns that are out there today.  The only problem I had was when I went to do my second panel of sheer fabric, the fabric that I chose was not wide enough for me to cut a second panel piece.  Hence, that is why I only have one sheer panel in the dress.  To give the skirt the voluminous full look, I made a short underskirt of tulle and netting.


To finish off the neckline and armhole areas I used bias binding.  I wasn't sure about it at first, but loved the look in the end. 


I purchased the sheer fabric from Joanns and the dress fabric is a satin fabric that picked up at Jomar.  Overall I'm very happy with how this dress turned out, and I got mad compliments at the wedding.  A good time was had by all and I was able to get my dance on.  Next up is Mr. D's matching shirt that I made. 


I think I may be in trouble here as he loved it so much he wants more of them.  I hope you all had a great weekend with lots of crafting.  I know I did as I only finished everything about 15 minutes before I had to run and get changed for the wedding.  There is nothing like working up to the last minute.

Friday, July 26, 2013

Alice & Olivia Matron Of Honor Dress Final Reveal

My friend Ms. K's sister got married last Friday and she sent me these photos over the weekend so you all could see the final reveal of the dress I altered for her sister's wedding.


This alteration turned out better than I thought it would, and everyone thought she looked glamorous.  I just wanted the bride to be happy and she was.

Here's Ms. K with her boys.


I first posted about this dress here.

Enjoy your weekend.  More good stuff to post.

Wednesday, July 17, 2013

Going Natural and McCall 6554

For sometime now I have been having issues with my hair due to all the stress and changes in my life whether it was work or dealing with the situation concerning my mother.  I even went to a dermatologist and it helped a little but then my hair would break off in other spots that were not treated.  A couple of months ago on a Wednesday night I came home and decided to cut all of my hair off.  I went into the bathroom and took a pair of scissors to it.  I then called my hairdresser up afterwards and let her know what I did.  Let's just say the conversation was very interesting.

I am now 2 months in and I'm liking the natural look.  I just wish my fro was bigger, but I'm glad to report that  it is now healthy and looks a lot better.  Time will tell (between December and February) if going natural solved my problem.  My hair tends to break-off during those months. 


In sewing news I have wanted a maxi skirt for a long time and have had this fabric sitting for a few months now.  I contemplated making a maxi dress out of it, but I wanted a solid cream at the top and the stripes at the bottom.  I could not find a solid cream to match close enough so I decided to make it a skirt.  The pattern I used was McCall 6654


I think quite a few people have used this pattern in blogland. 


It is literally three pieces (front, back and waistband) and the easist of skirts to put together.  I had mine sown up in a little over an hour, if that.  I paired with with a tank top and shear tank top to go over the top which I purchased from Body Central. 


 I plan on trying to draft a copy of this tank because I like it so much.

Friday, June 28, 2013

My latest Alteration Project - The Alice & Olivia Dress

Thank you so much for all the wonderful compliments about my band.  We do try to have a lot of fun when we play.  As long as the crowd is happy, we are happy too.

One of my co-workers recently asked me to make her dress for her sister’s wedding.  With schedules being crazy, her sister being impatient, she went ahead and ordered this Alice + Olivia dress from online for $297.00, only to turn around and ask me to make alterations/make the dress over.


We got together a couple of weekends ago and she told me that her sister wanted me to drape the bodice making it a little blousy and to give her a waistline.  A trip to Joanns was in order and we got to drive through the traffic for the U.S. Open that was held in our area this year.    Not to stray from the subject at hand, but my favorite thing was all the homes that opened up their driveways and lawns for people to park for a fee ranging from $25 to $30 a spot. 


I loved the bidding wars going on between neighbors.  I hear this goes on a lot, but I had never seen it before.

At Joanns we were lucky enough to actually find a lace to match the chiffon fabric of her dress.


I overlapped the lace to make a band on the front of her dress and sewed it on by hand as the fabric is very delicate.  To give the dress a little pizzazz and glitz we picked out diamond beading to lay on top of the lace.  Here is the beading pinned on to the dress.


At this point I only have to sew the beading on and then hem the dress up a little as it a little long for their liking.  The wedding is in a few weeks, but I’m hoping to have this done by the weekend when I see her for her last fitting.  I do apologize for the pictures not being the best quality.  They were taken with my iphone.  Have a great weekend!!!

Monday, June 24, 2013

Jumpstreet Band at the Water Tower!!

My friends are always asking if they can see my band but we've never had any really good video footage. Well, a couple of weekends ago we were interviewed by a local online video show and now we have footage.


I hope you enjoy!!

I've Switched to Bloglovin

I hope your week has started out well.  I figured I'd better get a handle on what site I wanted to use before Google Reader finally shuts down.  I have made the transition so you can
Follow my blog with Bloglovin .

 I've got some catching up to do so I'll be posting soon.

Wednesday, April 10, 2013

Tessuti Fave Top

My second top for Faye’s sew-a-long is the Tessuti Fave Top (free downloadable pattern at Tessuti Fabrics out of Australia).  


I first saw this pattern back in 2010 when Christina made it up, but at the time, I was not into downloadable patterns yet.  I wanted to make something up quick and easy since there was not a lot of time left on the sew-a-long.  This pattern is a one size fits all and the download is only 25 pages.  It is WELL worth all the taping you have to do.  There are only two pattern pieces to this top and from all the different Fave tops I’ve seen made up on the internet, and there are quite a few, it is flattering on everyone.  


Even though it worked out for me as this was a muslin to check for fitting and any modification needed, the only thing I would change for myself is to make the sleeves a little bigger.  My upper arms are a little on the thick side from all the weight lifting I did when I was younger so I need to make allowances for that, but otherwise, I love this top and see a few more of these in my future.  


I’m all about the comfort these days, especially on my days off and this is a top that you can either dress up or wear casually on the weekends just working around the house or doing errands.  I can even see myself lengthening this baby to a dress pattern to lounge around the house in. 


In addition to making this top last night, I decided to do a refashion as well to go along with it.  The skirt that is in this picture originally was a calf length skirt (Sorry I didn't take any pictures before cutting.  Sometimes I jump in before thinking) that I purchased years ago.  It was so long ago that I don't recall when I bought it, but I do know it was purchased between 1995 and the early 2000's.  I was never crazy about the fit (how it hugged my legs from the knees down) and last night it popped out at me and said, "make he shorter, so I did.  It was quicker than making one and now we are both happy, and my skirt will no longer just be sitting in a pile of clothes that I no longer wear, but am not ready to get rid of.

Linda, thank you for another successful sew-a-long.  It could not have come along at a better time as always.  I look forward to them and even though I was only able to get 2 tops completed, it's 2 more than I had before.  You rock!!!!!!  I also had a chance to look at all the lovely tops that were made by the other ladies and my blouse/top list is getting longer.  There were a few I saw that I know I have the patterns to in my stash, so you know I need to get busy.  Thank for all for the great comments that you all have been leaving me.  I hope the rest of your week goes by quickly.

Happy Crafting!!!

Monday, April 08, 2013

Simplicity 1716

As they say, better late than never.  I signed up for Faye’s 2013 Essential Top Challenge.  

 
I had high hopes that I would sew a top last weekend, but I was still finishing up a boxing skirt for a co-worker who had a boxing match Friday night. (more on that in my next post).  I’m glad Linda extended the date until Wednesday (couldn't you have extended it until the weekend?? ;).  I have high hopes that I can get another top/blouse finished by then, but if not, one and done ain’t bad either. I always enjoy doing her sew-a-longs because it helps me to focus on one thing and then just bump them out.
The first top I decided to start with for Faye’s challenge is Simplicity 1716, View B with a short sleeve.  


I purchased this pattern back in the fall not knowing if I could pull this one off or not, and I was not disappointed. 

The minute I finished it, my mother told me I had to make another one in a solid color, the dress version and one for her so she could wear it when going out.  

The directions are very easy to follow and as long as you have all the proper markings on your pieces before sewing, you shouldn't have any problems making this blouse.  


What makes this top is the design feature on the front of the bodice.


Another nice feature is the ruching at the back neckline area.  


This is done by sewing a piece of  3 1/4 inch elastic to the back of the neck.


I made size 14, and realized afterwards that I could have gone down to the 12 as this top fits a little loosely.  I'm thinking this is because there is a tunic and dress version to this pattern and you use the same pattern piece for all three garments.  I'm thinking in drafting the pattern, ease for the tunic and dress were taken into consideration. 

The only thing that I would change in the construction process is that before sewing the back neckline down to start making the cowl, I would serge the whole neckline edge first, so that you have a complete serged neckline if you own an overlocker.  The instructions don’t tell you to do this and if you follow their instructions, half of your neckline will be unfinished (the front of the cowl)  The fabric used for this top was a designer knit I picked up from Jomar.

 If you have not looked at this pattern, please do.  


It is a very flattering top and it’s a nice addition to anyone's wardrobe.  


Very different.  


I don't know if I'll get to them but the other tops I have in mind and am still planning on getting done are 


Vogue 8747

 
New Look 6150

 
Burda 9-2010 #114 (still need to trace) Has been on my list for over a year and the fabric is sitting and waiting.


Burda 9-2010 #109 (still need to trace) This has also been on my list for over a year and the fabric is waiting.


Burda 9-2011 #128 (traced) I just got the fabric for this but want to muslin it first as the fabric for this will be tricky.


Sunday, March 24, 2013

The Lily Skirt

Back in January I had the pleasure of test sewing the Yalta top for Lena.


I liked it so much that when Lena emailed me letting me know that she was coming out with her second pattern Lily,

                                                       (This picture is courtesy of Lena)
Here's my version.


I quickly jumped on the bandwagon and said I wanted to test sew this pattern as well.  Lily is the answer to that Marilyn Monroe skirt that likes to fly away when a breeze catches it.  Lily is a downloadable pattern of a 6 gore skirt.

The pattern consists of 48 pages that you have to tape together.  For those of you that have never worked with a downloadable pattern before, it's a breeze.  You just need some scotch tape.  Lena's patterns are very well drafted and her instructions are simple and easy to understand.  The 48 pages make up the actual skirt


and the lining pieces as well.


The fabric used for this pattern is chiffon.  Some of you might be a little afraid to work with that fabric, but you just have to jump in and try it.  There are ways to tame the slide.  To get this baby put together I interfaced both sides of the skirt where the zipper would be inserted.  That will help with the wear and tear of the skirt since as time goes by the zipper is a little stronger than the fabric.  Interfacing will help the skirt hold up longer.  I also serged all the seams.


 I interfaced the waistband of the skirt since I couldn't find my fusible tape.


That helps with any fraying and makes the waistband a little more sturdier.  I also applied some hem tape at the waistband area as well.  I wanted my waistband a little more stronger.


The end result give the waistband edge a nice clean finish.


 Here are a picture of the lining.


I liked working with this pattern because it enabled me to do some stash busting and to create something that is perfect to ring this Spring season in.


I know I can't wear it yet because it hasn't warmed up enough yet, but it gives me something to look forward to.  I'm counting the days.


LinkWithin

Blog Widget by LinkWithin